What is Picture Whitening
Picture whitening, also known as image whitening, is the process of adjusting the colors and tones within a photograph to make specific areas appear brighter, cleaner, and more vibrant. This technique is widely used in photography and graphic design to enhance the overall aesthetic of an image. It often involves adjusting the brightness, contrast, and color balance to achieve the desired effect. The primary goal is to improve the appearance of the image, making it more appealing and professional-looking. Whether you are dealing with a slightly dull portrait or a landscape that lacks vibrancy, picture whitening can be a valuable tool in your editing arsenal. It’s about bringing out the best in your photos, ensuring they look their absolute finest.
Benefits of Whitening Pictures
Whitening pictures offers several advantages that can significantly improve the visual appeal and impact of your images. Firstly, it can dramatically enhance the overall brightness and clarity of a photo, making it more engaging and easier on the eyes. Secondly, it can correct color imbalances and remove unwanted tints, ensuring that the colors in your image appear true to life. This is particularly useful for portraits, where it can help to even out skin tones and create a more natural look. Thirdly, whitening can breathe new life into older or faded photographs, restoring their original vibrancy and detail. Ultimately, whitening helps to create more professional-looking images, suitable for sharing, printing, or online display. The ability to control the light and color in your images is a powerful tool for any photographer.
Choosing the Right Picture Whitening Editor

Selecting the right picture whitening editor is crucial for achieving the desired results. The ideal editor should offer a range of tools and features that cater to your specific needs. Consider the complexity of the interface and whether it aligns with your skill level. A user-friendly interface is essential for beginners, while advanced users might prefer a more comprehensive editor with sophisticated controls. Compatibility with your device and operating system is another important factor. Ensure the editor supports the file formats you typically use and that it functions smoothly on your computer or mobile device. Also, think about your budget. Free editors are great for basic tasks, but paid options often provide advanced features and more professional results. Research different editors, read reviews, and, if possible, try out free trials to find the best fit for your photo editing workflow.
Online Picture Whitening Editors
Online picture whitening editors offer the convenience of editing photos directly from your web browser without the need to download and install software. This makes them accessible from any device with an internet connection. They typically offer a range of tools, including brightness, contrast, and color adjustment options, as well as specific whitening tools. The main advantage of online editors is their ease of use and accessibility. You can edit your photos on the go, without worrying about storage space or software updates. Many online editors also offer cloud storage, allowing you to save and access your edited photos from anywhere. However, online editors depend on a stable internet connection, and their functionality can be limited compared to more powerful desktop software. They may also have limitations on file sizes or the availability of advanced features. They’re perfect for quick edits and basic enhancements.
Free Online Editors
Free online editors are excellent for users who need to perform basic picture whitening tasks without investing in software. These platforms offer fundamental tools such as brightness and contrast adjustments, along with options for color correction and basic retouching. Although they might not have all the advanced features of paid editors, they are usually sufficient for simple photo enhancements. Many free editors also provide pre-set filters and effects that can quickly enhance your images. Before you start using an editor, make sure to understand the limitations. Also, be mindful of any watermarks or advertisements. Some free platforms may have restrictions on the file size of the photos you can upload or the resolution of the output images. Despite these limitations, free online editors offer a convenient and accessible way to whiten pictures, making them suitable for casual users and those who want to experiment with photo editing before committing to a paid service.
Paid Online Editors

Paid online editors usually provide a broader range of features and more advanced capabilities compared to their free counterparts. These platforms often feature advanced color correction tools, including curves and selective color adjustments, which allow for more precise control over the whitening process. They also frequently offer more sophisticated retouching tools, such as blemish removal and skin smoothing, enhancing the overall quality of your images. Paid editors generally provide higher resolution support, enabling you to edit and export photos with greater detail. They may also provide cloud storage and enhanced customer support. Subscription-based models are common, offering access to a wide range of features and updates at a regular cost. The investment is often justified by the enhanced features and overall quality of the photo editing experience. You can usually start a trial period to evaluate an editor before making a financial commitment.
Software Picture Whitening Editors
Software picture whitening editors are installed on your computer, offering a more powerful and feature-rich experience compared to online editors. Software editors provide a comprehensive suite of tools, including advanced color correction, masking, and retouching capabilities, allowing for highly detailed and precise edits. They are often preferred by professional photographers and graphic designers due to their enhanced control and extensive functionality. These applications do not rely on an internet connection, enabling you to edit your photos anytime, anywhere. They are also typically able to handle very large files and provide the highest resolution output. The primary drawback is the initial investment and the need for ongoing software updates. However, the professional results and the control they offer make software editors the preferred choice for serious photo editing.
Features to Look For in Editors
When selecting a picture whitening editor, consider essential features that will help you achieve the desired results. Look for tools that allow you to adjust brightness, contrast, and exposure, which are fundamental for whitening and enhancing your photos. Color correction tools, such as white balance and color temperature adjustments, are critical for correcting color casts and ensuring accurate color representation. Retouching tools, including blemish removal and skin smoothing, can help you perfect your images. The editor should support a wide range of file formats to ensure compatibility with your camera and other devices. Consider the availability of layers and masks, which are helpful for making non-destructive edits and controlling specific areas of the image. User-friendly interface and ease of use are also important. If the editor offers batch processing, it will let you apply the same adjustments to multiple photos at once. Always consider your personal needs and budget to select the features that best suit your requirements.
How to Whiten Pictures Step-by-Step

Whitening pictures involves a series of steps that, when followed correctly, will enhance your images effectively. The process starts with uploading your photo into the chosen editor. Then, you will adjust the brightness and contrast settings to achieve the desired look. Next, you can utilize specific whitening tools to target areas that need brightening. Fine-tuning the results involves making minor adjustments to balance the image. Finally, after you have achieved your desired look, the last step is saving and exporting your edited photo. This detailed process helps ensure that your photos are not only whiter but also look more vibrant and appealing.
Step 1 Uploading the Picture
The first step in whitening a picture is uploading it into your chosen editor. Most editors allow you to upload files from your computer, cloud storage services, or, in some cases, directly from your camera. Locate the upload button, which is usually indicated by an arrow pointing upwards or the words ‘Upload’ or ‘Open’. Click the button, and a file explorer window will open, allowing you to browse through your files. Select the image you wish to whiten and click ‘Open’ or ‘Upload’. The selected image will then appear in the editor, ready for adjustments. Make sure the editor supports the file format of your image, such as JPEG, PNG, or RAW files. If necessary, convert your image to a compatible format before uploading. This initial step is essential for beginning the whitening process.
Step 2 Adjusting Brightness and Contrast
Adjusting the brightness and contrast is a fundamental step in the photo whitening process. These settings influence the overall luminance and the difference between the light and dark areas of your photo. To adjust the brightness, you can usually find a slider labeled ‘Brightness’. Increasing the brightness will make the image appear brighter, while decreasing it will make it darker. Contrast, on the other hand, affects the range of tones in the image. Increasing contrast will make the dark areas darker and the light areas lighter, increasing the difference between them. Decreasing the contrast will bring the tones closer together, resulting in a flatter image. Carefully adjust these settings to bring out the details in your photo. Start with minor adjustments and observe how they affect the image. The key is to find the balance that enhances your image without making it look overexposed or washed out. Using a histogram can help you avoid clipping in highlights or shadows.
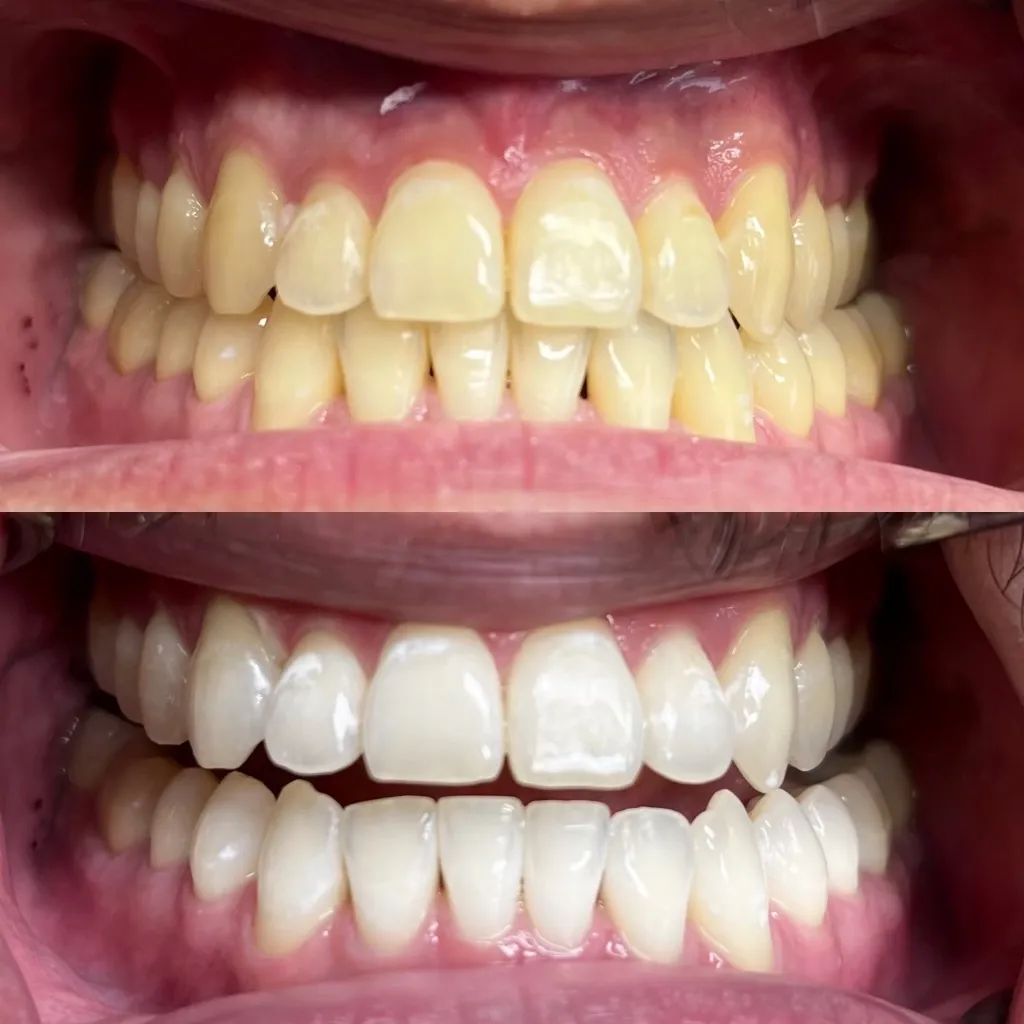
Step 3 Using Whitening Tools

Many editors provide dedicated whitening tools to simplify the process of brightening specific areas. These tools are designed to target areas of your image that require more intense whitening, such as teeth, skin, or the background. These tools might include a brush or a selection tool that you can use to paint the whitening effect onto specific parts of your photo. Some editors offer automatic whitening features that analyze the image and apply whitening where needed. Adjust the settings of these tools to control the intensity of the effect. You can adjust the opacity, size, and feathering of the brush to achieve the desired results. With these tools, you can brighten only the intended areas, maintaining the natural look of the rest of your image. Using whitening tools effectively is about targeted and controlled enhancement.
Step 4 Fine-Tuning the Results
Fine-tuning the results is the step where you make subtle adjustments to your image to ensure that the whitening looks natural and balanced. It often involves adjusting the color balance and saturation. To avoid a washed-out appearance, slightly increasing the saturation can help restore the colors’ vibrancy. You can use the color balance tool to adjust the levels of red, green, and blue in your image to correct any color casts. Zooming in on your image allows you to see details more clearly and make precise adjustments. Comparing the before and after versions of your photo lets you see how the changes are affecting the image. This can be done by toggling between the original and the edited versions. Make minor adjustments until you are completely satisfied with the result. At this stage, you’re aiming for perfection, so take your time.
Step 5 Saving and Exporting
Once you’re satisfied with your edits, the final step is saving and exporting the image. Choose the appropriate file format and quality settings to preserve your changes. Most editors allow you to save your image in formats like JPEG, PNG, or TIFF. JPEG is a good choice for most photos because it provides a good balance between file size and image quality. PNG is better for images with transparent backgrounds, while TIFF is often preferred for professional use because it preserves the highest level of detail. When exporting, consider the intended use of the image. For web use, a smaller file size is preferable, while for printing, you’ll want a higher resolution. Be sure to save the edited version of your image as a separate file to preserve the original. This ensures you always have a backup copy of your original photograph.
Common Mistakes to Avoid

Avoiding common mistakes ensures you achieve optimal results in picture whitening. Over-whitening is a frequent issue, leading to an unnatural, washed-out appearance. It’s important to make subtle adjustments and avoid going overboard. Another common mistake is not saving the original image before editing. This practice lets you revert to the original if you are unhappy with the edits. Failing to consider the overall context of the photo can result in edits that don’t match the scene or subject. Overlooking details, such as skin tones or highlights, can also lead to unsatisfactory results. Always take the time to review your work and make sure the changes look natural and enhance the photo’s overall appeal. Practicing and experimenting with different settings is key to mastering photo whitening and avoiding these pitfalls.
Over-Whitening the Picture
Over-whitening the picture is a common mistake that can severely detract from the quality and natural appearance of your images. This happens when you apply too much brightness, contrast, or color correction, resulting in an overly bright and unnatural-looking photo. Skin tones can appear washed out, details are lost, and the image loses its depth. To avoid over-whitening, use subtle adjustments and carefully monitor the changes you make. Always compare the before and after versions to assess the impact of your edits. It’s helpful to zoom in on areas like skin and eyes to see how the changes affect them. Be particularly cautious with the highlights, as they can easily become overexposed. If an image begins to look artificial or lacking in detail, reduce the intensity of your adjustments. The goal is to improve the image without sacrificing its realism.
Not Saving the Original
Not saving the original image before editing is a critical mistake that can lead to regret. When you directly modify your original photo without keeping a backup, you risk permanently altering it. If you’re not satisfied with the results of your edits, there will be no way to revert to the unedited version. Moreover, if the edited image gets corrupted or if you want to make further adjustments in the future, you’ll have no original file to start from. Always create a copy of your original photo before you begin any editing process. This ensures that you always have an unedited version to revert to. This practice is essential for preserving your photographic work and protecting your creative options. It is a basic rule of photo editing that helps to prevent any potential loss or regret.
Tips for Perfect Picture Whitening

Achieving perfect picture whitening requires the implementation of some key strategies. Start by carefully evaluating the original image, paying attention to its brightness, contrast, and color balance. Make your adjustments in small increments, and regularly check the results to avoid over-editing. Use a calibrated monitor to ensure accurate color representation. Experiment with various tools and techniques to see what works best for your specific needs. Consider using layers and masks, which allow you to make localized adjustments without affecting the entire image. Always be mindful of skin tones and other critical elements, and strive for a natural-looking result. Practice consistently to improve your skills and develop a keen eye for detail. By combining these tips, you will be well-equipped to enhance your pictures and achieve the perfect look.